Introducing new things
This post follows on from a previous post about keeping coding interesting with multiple skill levels. In this post, I’ll be expanding on the idea by talking about putting together new activities to run at your Code Club or insert-you-coding-maker-startup-equivalent-here.
Types of activities
Although not every activity needs to be step-by-step, the expectations need to be clear. In the example of designing a game, the pre-requisites must be clear so that it’s possible to complete the activity comfortably, with enough challenges to keep it interesting. Not having the right pre-requisites can prove frustrating for kids, as is skipping important steps e.g. having a clear idea about what state a game will be in at the first milestone. If the activity shows a basic framework for a bigger project, then this should be clearly stated.
Start from a working example and work backwards
The way that I write guided activities is by starting from a working model and tracking backward through the steps, until I find myself back at the start. This is really one of the most fun things to do, because it means that you have to sit down and play; essentially building something that is enjoyable, fun, and exciting. Sometimes if the idea it a bit more complicated, I’ll leave resources that are files that can be downloaded. On an old TV show known as the Curiosity Show I loved watching as a kid, I found it hilarious when they would always say, “and here’s one I started making earlier” to fast forward through anything mundane. In the same way, sometimes it isn’t feasible for kids to draw every single sprite, because that’s part of the customisation they’ll do later. Make sure each step covers only one main task or milestone, adding a clear instruction to test and save, and give some sort of visual clue as to what their project should look like at that point.
To develop your working example is just a matter of sitting down and making something without really making too many notes, and just snapping the odd photo at a key point in the contstruction/development. It’s a great time to just relax, and enjoy creating. This is the feeling you’ll want to be duplicating with the activity you put together later. Try to aim to get a basic version of your idea working first, then add small features to make it better. Whenever I come across something inspiring or useful, I’ll try to take note of it straight away, so that I can refer back later rather than forgetting about it. It’s amazing how one things leads to another and suddenly you find yourself with a creation that is rather unique.
The other advantage of starting with a working model is that you can show people and get feedback one whethe it’s good, before you spend your time putting together a pointless activity (like the time I wrote up a cool Python acticity to teach functions, only to realised that Code Club already had almost the exact same activity already written - ha!) And don’t forget to keep an eye on the time. You’ll want to have a good idea how long it will take to do. For instance, our robot workshops can usually be done in two one hour session…unless things don’t work right that day ;). We’ve actually had some huge fails before…at one point I thought everyone was going to rage quit because we had a few frustrating session in a row. But it all worked out, and some of those kids are still super motivated, and doing awesome things now.
What, why, how
As a kid, I always found it frustrating whenever we had to do something that seemed to have no context or application. The other thing that confused me, what not knowing how far through an activity we were, and just having to keep asking, “ok what do we do now?”. So I try to make a point of explaining these things when introducing an activity.
- What: explain what we’ll be achieving in the hour
- Why: explain why it is a useful activity and what it could enable us to do in terms of more advanced/fun/interesting activities in the future
- How: show the path we’ll be taking to our final goal(s) and give some milestones so the goal isn’t too distant
Initially I tried using slides, but slides can take time out of our one hour activity, and at the end of a long day, even I have trouble paying attention to a slide deck. This brings me to Infographics; a quick way to get a process and related ideas across really quickly.
Here’s an example I made on Vengage for free:
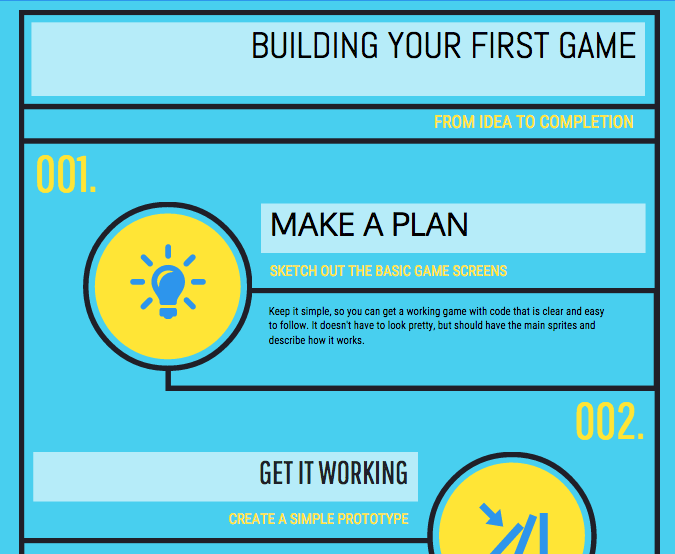
Once we know where we’re going, everyone is super keen to rampage toward the first milestone.
Cheat sheets
Cheat sheets are a great reference as long as they are really minimal. By minimal, I mean only the information that is required for the task. Anything else is just distracting. In our Python GoPiGo robot workshop, I usually put a few basic Linux commands on the whiteboard, to save kids scrolling back and forth through the activity document. Use cheat sheets to give almost instantaneous access to reference material i.e. faster than it takes to sort through Google search results.
Test out the activity
You’ll need a guinea pig to test out your activity. It usually works well if that person is around the same skill level as the activity is designed for. e.g. if you get your grandma to try the project, and it takes a week…that’s not a real good indicator of how long a bunch of 11 year olds would take to do it.
While you get your activity tested, get some feedback on what is clear and what is a bit confusing. Later, go back over the activity in your mind, and make relevant changes that would have smoothed out whatever bumps your guinea pig tripped over.
Again, use only what you need to get a message across
As before with the minimal cheat sheet, you want to supply only the information that is required for each step of the activity. It’s ok to explain why we’re doing something, or have a quick bit of background for something, in one sentence; just be careful about using a full screenshot where one sentence would be enough. And likewise, don’t spend a paragraph explaining something where a screenshot would make it crystal clear in a second. Make sure you crop any irrelevant parts of any images, while keeping enough to give it context. If you can’t do that, just say where to find a particular icon or software feature e.g. “In the bottom left, you’ll see the Scratch stage”.
Check for understanding or make sure it’s clear
Yep, I’ve probably mentioned this one before. I try to remind the kids at our Code Club to hassle me up if I say something that doesn’t make sense to them, or isn’t clear. That way, I start to make sure I explain things better too. However, in an activity that I’ve written, I try to give the kids a way of checking their code or whatever they’re building. This could just be a listing of the code they’re adding, that shows where they need to add it. Or perhaps add a quick screenshot to show what the screen looks like when the code runs. Give a suggestion for any common mistakes that you’ve seen during testing, and if you’re supervising the activity, be sure to point back to the section if the answer to a question is already written.
Suggest next steps or how to apply the new skills
This is a great way to get the more advanced kids to jump straight into more challenging task, and apply their new skills. It’s helpful to remind the reader what they’ve achieved and how it will make new things possible when bringing their own ideas to life. A good example might be to explain how an activity has prepared them to apply some of the concepts to robots, or how the activity can be combined with another previous one. And of course, be sure to get kids to show each other what they’ve made.