Scratch patterns
This post is for kids or teachers who have a basic understanding of the Scratch interface. It’s really light, and for more detailed information you should always refer to the Scratch Wiki.
How do I make my player move when I press keys?
This is probably the most common beginner question I hear at our Code Club. If you asked this, that’s great, because it means you’re already got an idea of what you want the player to do in your game. Design and planning is a large part of the game-building process and can save you lots of time later on. If you have your main idea clear in your mind (sketching it on paper always helps), it will make many decisions easier to make as you progress. For example, you might not be sure whether to use a script on your sprite or background: But if you refer to your basic idea, you might realise that you can trigger a sound effect at the same time, or some other reason for doing it a certain way.
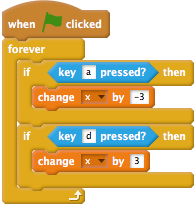
The code above will move your sprite left and right, when pressing the ‘a’ or ’d’ keys. Following this pattern, you might be able to work out how to move up and down, and do other things when a key is pressed.
How do I make the player wrap/stop at the edge of the screen?
Here’s another common question, “How do I get my sprite to go off one side and come back on the other?”. This is known as “wrapping” because the sprite “wraps” around, much like text does.
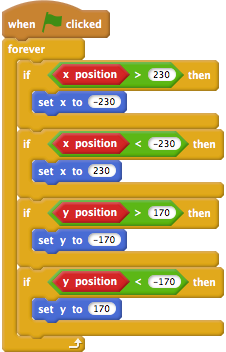
This code can just run in the background, sometimes we might also want to set the x and y positions of the sprite, before the forever loop. This makes sure that the sprite will always start in the same place when we click the green flag. Play around with the numbers to figure out how to make the sprite stop at the edges of the screen, instead of wrapping.
My sprites aren’t in the right place when my program runs!
In the same way that we set the x and y positions above, we can also set other attributes of our sprites, such as costume, size, or effect. Make sure you do this before the forever loop, since we only want to do this once when our script runs. Setting things up when our program starts is called ‘initialisation’.
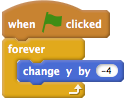
How do I do gravity?
This is essentially a forever loop that keeps changing y by a negative value; always moving our sprite downwards.
Remember, now that you’ve got your sprite always moving down, you’ll still need to check for a collision with the ground! For the ground, just create a sprite, and draw a line across, then name the sprite something meaningful, like say, ‘ground’. Place the sprite at x position 0 and y position 0, to make sure it will line up with your game screen. Then just add a check to the above gravity loop, so your sprite will only go down when not touching the ground.

There’s an interesting discussion of gravity on the Scratch wiki, although as I mentioned previously I really like the way Al Sweigart explains it. If you want to get started there’s also a super easy Code Club project, the Dodgeball project.
Drawing your own sprites
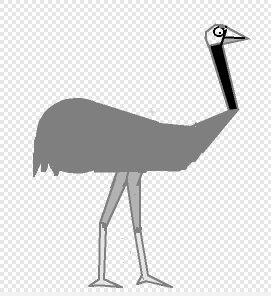
When I wrote the Moonhack activity I wanted to create some animal sprites. The way I approached this was to search the Internet for some animals. Noticing that the animal shapes could be built up from basic circles and triangles, I drew some of these and then coloured them in. Once you have the basic shape built up, it’s easy enough to add some details. When you want to animate these, just duplicate a sprite, and change it slightly. Then write some code to change the costume at the right times. If you borrow some images you find online, be sure to check whether there is any licensing or requirements for attribution (telling people where you got the image from). That way, you won’t get an email later from someone who is upset that you didn’t give them credit for their work.
Taking these ideas further
Although the examples above are just on Scratch, the same ideas can be applied to more advanced projects. In our Code Club’s robot workshops, we use Scratch and Python to control motors and servos. The motors move the robot around, and rather than checking for Scratch screen borders, we use sensors to see if we are going to bump into a wall. It’s essentially the same concept applied to a robot instead of a sprite. Before we set up our sensor, we initially control our robot with keys, much like we do with sprites in Scratch. Our servo is used to move a camera around, and in this case, we check the position of the servo to stop it when it goes too far. So while you’re making a game in Scratch, try and think about how the same concepts can be applied to other things, such as robots, lights, or anything we might want to automate. What about automating other checks? Warning: Don’t mess with anything that plugs into a power point!
Where can I learn more?
These are just some ideas to get you started, based on questions we hear at our Code Club. Try searching the Scratch wiki for more features that you’d like to include in Scratch games. Or search the Scratch site where lots of people have their own ways of doing things. Try and look for your own patterns in code, and you’ll find yourself reusing thes again and again. Don’t just copy the first one you find, though. While looking at someone else’s project, you may realise that there’s an even easier way. Something else could happen: you may find that what seemed really hard, becomes easier when you know the patterns :). There’s also lots of great books that will cover Scratch concepts in much more depth. Because commercial books have generally been edited a number of times, by people who are great at explaining things, they can sometimes be much easier to understand and follow than trying to collect information from many pages online.